How do you go about making a photograph of this type? Observation comes first, then composition. Most often, you’ll initially compose without optical aid—you will form an image in your mind—and then you’ll translate that into an image in the viewfinder via appropriate selection of focal length. (Sometimes, you’ll compose with the camera at your eye. Either way, you’ll make a decision regarding focal length.) So two things become fixed: The composition and the focal length. The first is an artistic matter, the second a technical matter.
Inherent in your composition is your decision regarding which elements in the scene should appear sharp in the image. In a photograph of this type, chances are that you want everything to be sharp—from the nearest object in the scene to the furthest, often to the horizon way out yonder. We’ll reduce this artistic stuff to a technical matter by recognising that, actually, there are three things that are now fixed: the distances to the nearest and furthest objects that must appear sharp, and the focal length.
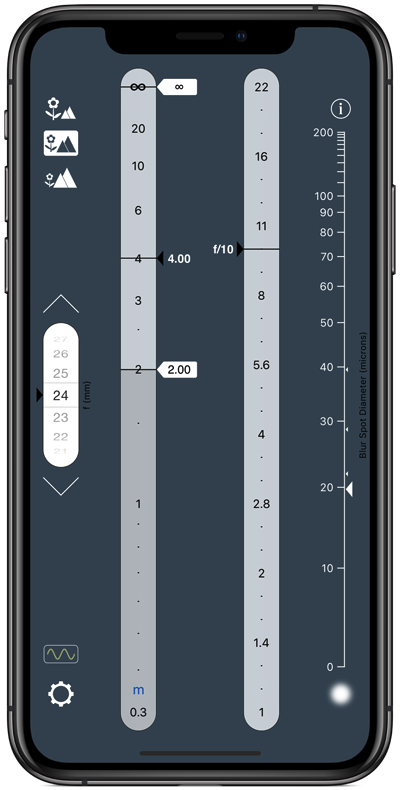
Let’s take a concrete example: We are using a 24 mm lens on a camera with a 35 mm sensor, and we want everything from 2 m to infinity to appear sharp in our image. What lens settings (what focus distance and what aperture) would achieve our desired results?
The focus distance is easy, at least in this case (where the far distance is infinite): We’ll focus at twice the distance to the nearest object. That’ll be 4 m.
What about the aperture? This is almost as easy. Do you have a depth of field scale on that lens? Yes? Go ahead and use it. It’ll be a bit of a nuisance reading the scale, because we’re right at the top end of it, but you should end up with an aperture just under f/5.6.
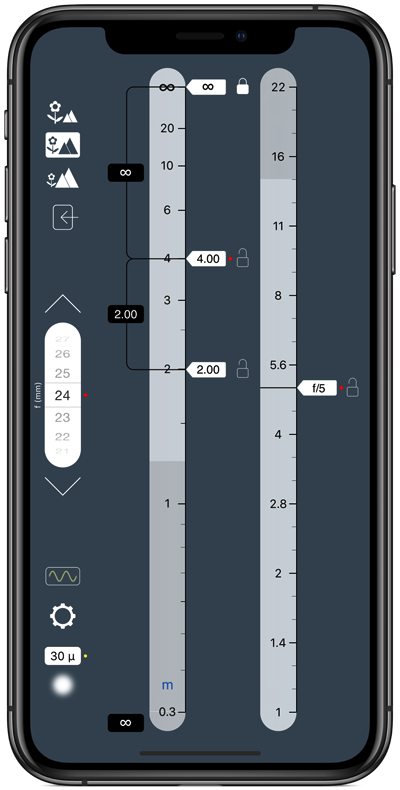
Don’t have a depth of field scale? Not to worry—there’s an app for just about anything these days. A depth of field calculator will do the job:
Just a few simple steps:
1. Select the focal length using the scroll wheel on the left.
2. Slide the far limit pointer up to infinity, and then tap its lock button.
3. Slide the near limit pointer to the 2m mark
Done
You’ll hopefully agree that, in shots of this type, you want absolutely everything to appear sharp, from the grains of sand in the foreground to objects on the skyline in the distance. (Of course, a wee bit of motion blur in the waves is desirable. We discuss below how to deal simultaneously with depth of field and motion blur.)
OK, you’re done with inputs. Read the outputs: The aperture you’ll use is f/5. And, hey, what do you notice? The focus point ends up at twice the distance to the near limit of depth of field, just as I said it would.
All this is standard practice. Either way—whether via depth of field scale or depth of field calculator—everything from 2 m to infinity will be nice and sharp if you focus at 4 m and shoot at f5.
Or so you would think. Alas, your prized shot may not be as sharp as you hoped. You won’t be alone. Disappointment is so common that Zeiss felt the need to explain to customers what’s really going on. No, don’t worry, those expensive lenses are quite OK, they say. The problem lies elsewhere: Depth of field scales are constructed using an outdated standard that no lens maker dares change unilaterally. We’re stuck with it, and the results are not pretty.
Because a depth of field calculator does essentially the same thing as a depth of field scale on a lens, we can illustrate what’s going on by chatting about the calculator. There is an additional, essential setting on a depth of field calculator that we have yet to mention: the circle of confusion (CoC). The CoC is the maximum diameter of an out-of-focus blur that you’re willing to tolerate on your film/sensor, at least for that part of the image that interests you. On any depth of field calculator, you’ll have to input this value (some calculators have you choose your camera model, but that serves the same purpose, because the calculator matches that information to a pre-defined CoC value). The algorithm that calculates depth of field then places the near and far limits of depth of field at precisely those distances that will result in a CoC exactly equal to the one you specified. For a 35 mm “full-frame” sensor, the standard CoC is 30 microns. So, in our example above, any point-like object 2 m from the camera, or on the horizon, will appear on our sensor as a blur 30 or so microns across. You know, that’s actually a rather big blur. Blow that image up to any reasonable size as a good quality print, and you’ll see that those nearest and furthest objects are not terribly sharp.
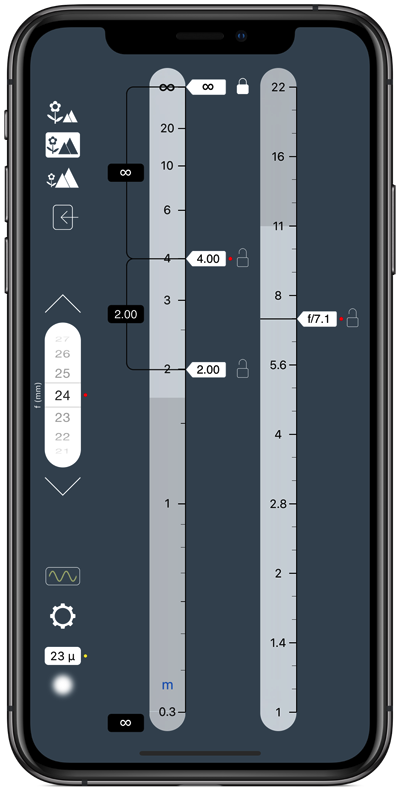
Experienced photographers know this. For generations, they have tended to stop the lens down a little beyond the aperture recommended on the depth of field scale. Alternatively, on a depth of field calculator, we can choose to set a smaller CoC (all calculators allow you to do this, either directly or by “cheating” in your choice of camera/sensor). For example, set blur diameter to 23 microns. (In the screenshots, the blur diameter is shown at bottom left.) You’ll find that you have to increase your aperture to f/7.1 in oder to achieve the depth of field you’re after with this higher quality standard. But that’s OK, you’ve got what you wanted: a sharper image.

But why stop there? Why not go for an even smaller CoC value and thus an even sharper image? You’ll have to use an even larger f-number but, hey, you’re only at f/7.1, so you’ve got several more stops to play with. OK, let’s do it—choose a slightly smaller CoC. The f-number will go up. But just how much further can we take this process? Perhaps not far. Perhaps fear will restrain us, for at large f-numbers lurks diffraction. On a standard depth of field calculator, diffraction is ignored, so going to large f-numbers gives the illusion that we can achieve greater image sharpness. But everybody knows that diffraction is there, adding its own blurring effect. So, with a standard depth of field calculator, or with a scale on your lens, you really have no idea how far you can stop down before things start to get worse rather than better. It all gets too complicated and too fiddly, and no matter what you do, you can’t be certain you’ve hit on the best possible aperture setting.
Remember what we said about experieced photographers stopping down a little further than their depth of field scale indicate? Well, yes, only a little further — they don't stop down too far. How often do you see them shooting at f/22? They know diffraction is there, but what they don't know is exactly how far they can go before it gets too intrusive.
So, clearly, all this is not best practice in this kind of photography or cinematography.
How to work with huge depth of field: best practice
For most situations in cinematography, and for landscape, architectural and any other photography where you want lots of depth of field and where you want absolutely the sharpest image, best practice is very different from the above. Think back to the discussion on the composition process and recall that it results in three key quantities: focal length and the distances to the nearest and furthest objects that must appear sharp. Ideally, you want some mechanism whereby you directly input those three quantities and then, from that, derive the two key bits of information you really need: the focus distance and aperture that, in line with our goals, result in the sharpest possible image.
There is only one way to do this. You’ll need a unique app: OptimumCS-Pro.
Note that we haven’t changed camera. We’re still using a 35 mm sensor. All we’ve done is to specified a smaller that standard blur diameter.
From the above description, it will hopefully be obvious that, not only does this app do something that no depth of field calculator does, it is also significantly easier to use than a depth of field calculator. There is no fiddling about — the information you input is derived naturally from the creative process of composition, and the output is exactly the information you need to take the shot.
One thing that’s particularly cool is that optimum focus distance and aperture are completely independent of camera format. You don’t have to enter a blur diameter value. In fact, what OptimumCS-Pro does is to determine the settings that will give you the smallest possible blur diameter for your nearest and furthest objects. It also displays what that blur diameter is, just so you know what you’re getting. To make it absolutely clear: OptimumCS-Pro calculates the aperture that gives you the sharpest possible photograph, not a photograph that simply meets some previously specified standard. Remember that blurring is due to two things: defocus (objects being blurry on account of being behind or in front of the focus distance) and diffraction. As f-number is made larger, defocus blur is reduced while, conversely, diffraction is increased. Somewhere, there is an optimum f-number that minimises the combined effects of defocus and diffraction. OptimumCS-Pro calculates that f-number. (You may have noted that I’ve stopped referring to CoC and instead speak of “blur diameter.” A CoC is a purely geometrical construct that ignored diffraction. When I speak of blur diameter, I’m referring to the real-world blur resulting from the combination of defocus and diffraction.)
Let’s revisit our concrete example. The suggested aperture derived from OptimumCS-Pro is f/10, fully 2 f-stops higher than the value provided by the lens’ depth of field scale. Shoot at this aperture and you’ll have a much sharper image. Don’t shoot any higher, as diffraction will degrade the image. Don’t shoot any lower, as defocus will degrade the image. Check out the image data display (on the right of the app’s main screen). The blur diameter you’ll end up with if you shoot at the optimum settings is much smaller than the “standard” 30 or so microns. At 20 microns, this is as small as it can get (for this specific example).
Be aware that OptimumCS-Pro is definitely not a depth of field calculator that simply happens to "work backwards" (or the right way, depending on how you look at it). Simply changing around the order of operations on a depth of field calculator would not result in it doing what OptimumCS-Pro does.
Now, you’ll have to admit that the example we’ve been working with is a relatively simple one (one that treats depth of field calculators relatively gently). We really should also look (briefly) at situations where the far limit of depth of field is not at infinity, say in cinematography where you have two actors at different distances from the camera and you want both of them to appear sharp. Or, to take a concrete example in photography, consider this: You’re shooting an interior scene for an architectural journal. You have a 14 mm lens on your camera and you need everything from 1 m to 10 m to appear sharp. On what distance do you focus and what aperture do you use for the shot? Using a depth of field calculator to find a solution would be the very definition of an exercise in frustration (try it)! You’ve got much better things to do with your time. The scale on your lens can do the job but, as with the depth of field calculator, it certainly won’t give you optimal results. Now try getting the information you need on OptimumCS-Pro. You’ll have it in mere seconds. And your image will be as sharp as it can possibly be.
There is one final matter that needs discussion before we move on: the issue of motion blur.
In many practical situations, the optimum aperture ends up being a large f-number. In low light situations, this necessitating long shutter speeds which, in turn, can sometimes lead to motion blur. If motion blur is an issue, the user may have no choice but to use a shorter shutter speed and thus a smaller than optimum f-number. But that’s OK — it doesn’t invalidate the OptimumCs-Pro method, nor does it suggest that it should not be the starting point in one’s decisions regarding aperture. You will notice that the image data display on the main screen of the app includes three small markers, in addition to the large pointer that indicates the blur diameter you’ll get if you shoot at the optimum aperture. The smaller markers indicate the blur spot diameter if you shoot at, respectively, ±1, ±2 and ±3 f-stops away from the optimum aperture. Yes, they indicate that you’ll lose image sharpness, but they’re there to let you know how much you’ll lose, so you are able to make technical and creative decisions confidently with all the necessary information readily at hand.
Clearly, using OptimumCS-Pro is best practice in the kind of photography or cinematography we’ve been describing. And, the laws of physics being what they are, this will remain best practice (think about it: once you have the means to determine the optimum settings, there is simply nowhere else to go for improvement).
Are depth of field calculators useless, then? Heaven forbid, no! Read on.
How to work with shallow depth of field
OptimumCS-Pro serves a particular purpose: We use it when we want the sharpest possible image, mostly in situations where objects of interest are at widely differing distances from the camera. There are, of course, certain types of photography and cinematography where this is not what we’re after and not what we’re dealing with. Take portraiture, for example, or wildlife photography. We may want a colossal depth of field but, then again, we may be willing to settle for something more modest, or we may very much prefer a particularly shallow depth of field.
Consider this example: You’re shooting (with a camera) a critter located some distance away. Of necessity, you’re using a long focal length lens. You’re keen to keep the shutter speed as high as possible to minimise vibration and motion blur. But you want sufficient depth of field to render the entire critter sharp in your image. So you’re looking for the largest aperture (smallest f-number) that will give you the depth you want. You’ll use a depth of field calculator for this.
In fact, in any situation where you deliberately wish or need to blur the foreground and background, a depth of field calculator rather than OptimumCS-Pro is the correct tool. The calculator allows you to set how much blur you want and where you want it, whereas OptimumCS-Pro may produce a sharper picture (deeper depth of field) than you actually want.
As always, choose the right tool for the job.
Introduction
For the purposes of this article, we’ll assume an understanding of the fundamentals of depth of field. We’ll start by looking at standard methods in working with depth of field, and we’ll consider whether such methods do indeed constitute best practice. Sorry to spoil the story but, as it transpires, the standard way is not, in fact, the best way. And as it’s not the best, we’ll have to discuss what the best way actually is.
To keep the narrative flowing, we’ll initially not discuss specialised techniques. But after we’ve gone through the basic principles, we’ll expand the discussion to include lens tilts and the focus stacking technique.
And then, after a wee summary, we’ll be at the end.
We’ll look at examples in photography but, with the exception of specialised techniques, the principles are the same in cinematography.
This discussion will be as non-technical as I can possibly make it, not because the technical stuff isn’t fun or instructive, but because I want to keep this article at a reasonable length. Besides, most photographers and cinematographers are artists, not physicists. For those who crave graphs and the relevant math, check out the wealth of information available elsewhere on this website.
How (not) to work with huge depth of field: the standard approach
Consider scenes such as landscapes, architectural scenes, indeed any scenes with objects of interest at very different distances from the camera:
Best Practice in Working with Depth of Field
George Douvos
So then, when using a depth of field calculator, is there anything in particular that constitutes best practice? Well, clearly, choosing a suitable blur diameter is a key requirement. You’ll need to think about how sharp your image has to be. This depends directly on how the image will it be displayed. Photographers need to ask: Will it be printed or displayed electronically? At what resolution? How large will it be? From what distance will it be viewed? How discerning are the viewers? And so on. Cinematographers will ask related questions. You’ll need to experiment and decide what works for you. All this is, of course, standard practice.
Apart from that one issue, usage of depth of field calculators is relatively simple. When it comes to best practice, there is only one other matter that needs addressing. We’re already touched on it: the issue of diffraction.
To put it bluntly, if your calculator does not use an algorithm that takes diffraction into account (and none bar one does), then you risk getting things terribly wrong. What makes an image blurry is the size of the blur—it doesn’t matter if that blur is due to defocus or diffraction or (as is the case in reality) a combination of the two. The calculator must accurately calculate the size of that blur. To pretend that diffraction doesn’t exist and does not contribute to that blur makes no sense.
TrueDoF-Pro is the only depth of field calculator that takes diffraction into account. In a sense, it might be more accurate to refer to it as an “image sharpness calculator.” What it does is this:
1. On the “settings” screen, you specify the diameter of the blur that you judge as representing the transition between sharp and blurry.
2. Then, when you make your inputs on the main screen, the region of sharpness is shown on the distance scale as the region between the two red needles. The blur size for objects at the distances indicated by the needles themselves will be that which you specified on the settings screen.
Yes, this is more or less what a depth of field calculator does, except that in TrueDoF-Pro we’re dealing with real-world blurs, not merely the geometrically constructed blurring due to defocus. The consequences are significant. If you start at a low f-number and gradually increase it, you will see the two red needles diverging. This is what you expect. Increasing f-number decreases defocus blur, so only objects that are far from the focus distance end up appearing blurry. And at low f-numbers, diffraction does not significantly intrude. As you continue to increase the f-number, however, you’ll get to a point where the needles stop diverging. Increase the f-number even further, and you’ll find the needles converging. What’s going on? Well, with diffraction now making a significant contribution, only objects close to the focus distance can appear sharp (the defocus blur is small for those objects, and serves to counteract the significant blurring due to diffraction). You can probably work out what happens if you take this large f-number business even further: Diffraction becomes so bad that even objects at the focus distance itself are more blurry than the target blur value you specified on the settings screen. This is the equivalent of having no depth of field at all.
So why does all this matter? Surely this is only an issue at very large f-numbers. But what exactly do we mean by a “very large” f-number? In actual fact, diffraction shows its effects at rather smaller f-numbers than you may have imagined.
If you’re using a camera with a 35 mm sensor, you’ll find, through using TrueDoF-Pro, that you’ll not really want to go much beyond f/16 (if the blur diameter is set to 29 microns). You’ll understand why lens manufacturers never make lenses that stop down beyond f/22, at least for 35 mm cameras. Cameras with smaller sensors need correspondingly smaller blur spot diameters in order to achieve adequate sharpness when the image is enlarged for viewing. Try this: Set the recommended blur diameter for a 4/3” sensor (15 microns). You’ll then find that, beyond f/8, things start looking nasty. By f/11, you have the equivalent of zero depth of field—the blur diameter is roughly 15 microns even at focus, and everywhere else it is much worse.
So why do lens manufacturers make lenses that stop down all the way to f/22 for use on cameras with small sensors (by which I mean sensors smaller than 35 mm)? I haven’t asked them, but I suspect that the reasons are related to concerns regarding customer perceptions—would some customers see a lens as inferior to another model if it stopped down only as far as, say, f/11?
In any case, no matter what cameras you use, diffraction exerts its influence well before we encounter the extreme cases we’ve been discussing here. Given that it’s simple enough to factor its influence into sharpness calculations, it follows that best practice would consist in using a depth of field calculator that does precisely this. And let’s not forget that we need, as has always been the case, to pay attention to choosing a suitable blur diameter.
The story so far
If you’re shooting scenes where there is more than one object of interest and these objects are located at different distances from the camera, and you want maximum image sharpness, use OptimumCS-Pro.
If there is a single object of interest, or a tightly clustered group of objects, and if, for technical or artistic reasons, you’ll accept or desire a blurring of the background and foreground, use TrueDoF-Pro, and think carefully about what blur diameter is suitable for your needs.
Where to from here?
Well, we’ve covered the sort of photography that the vast majority of professional photographers and dedicated amateurs undertake. It’s time now to consider some specialised techniques in working with depth of field. There’s a lot, though, that we won’t discuss. We’ll not cover macro photography, or underwater photography… or a number of other things, mostly for the good reason that these sorts of specialised topics belong in articles of their own, and for the even better reason that I don’t think it appropriate to talk about things in which I lack expertise. We’ll continue, then, with a discussion of techniques that pertain to the main topic: depth of field in landscape and architectural photography.
A special case: lenses that tilt
Want to get serious about image quality in landscape and architectural photography? Get yourself a lens that tilts. Such lenses are readily available for DSLRs. (Or get yourself a view camera, which we’ll discuss shortly.) Provided that the geometry of your subject matter is favourable (and it often is) a tilting lens can give huge depth of field. What constitutes suitable geometry? Well, something like what you saw in the first image in this article would be perfect. [1]
So, what constitutes best practice in utilising tilts? Well, everything we have said so far regarding the superiority of the approach made possible by OptimumCS-Pro still holds when tilting a lens. By definition, you get the best possible results from these lenses, as with any others, when you shoot at the optimum focus distance and aperture.
But, you might protest, how does one use OptimumCS-Pro to find the optimum settings when the distance scale on the lens is rendered inaccurate, as it is when a tilt is applied? Well, actually, the distance scale remains very useful (indeed, essential) for our purposes. We just don’t use it to measure actual distances to objects. Here’s our procedure:
(1) Compose.
(2) Adjust the tilt so that that focusing from one extreme of your desired depth of field to the other results in the smallest possible rotation of the lens’ focus collar.
(3) Use the lens’ distance scale to measure the “distances” to the nearest and furthest extreme of your desired depth of field (it is important that you do not measure distances using some external device, such as a laser rangefinder).
(4) Enter those values into OptimumCS-Pro, even if they seem very different from actual distances to the objects.
(5) Set the optimum focus distance, as indicated by OptimumCS-Pro, using the lens’ distance scale.
(6) Set the aperture to the value indicated by OptimumCS-Pro.
Why does this work? It works because it’s equivalent to the technique we now describe for view cameras.
If you use a view camera, you’ll usually want lots of depth of field, and you’ll know that achieving this is not always easy. Indeed, assisting with that task is one of the reasons why movements are built into the camera.
Significantly, view cameras have one major advantage over other cameras: one needn’t bother with distances to objects — it’s actually much easier to deal with depth of field matters by working in image space rather than object space. In other words, you’ll be working with distances between the lens and the film plane.
You’ll need a ruler, calibrated in mm, attached to your camera so that it can be used to measure the distance between the front and rear standards (some cameras come equipped with suitable scales). And you’ll work in this sequence:
(1) Compose
(2) Carry out all necessary movements
(3) Focus on the nearest object that needs to be sharp. Note the distance between the front and rear standards.
(4) Focus on the furthest object that needs to be sharp. Again, note the distance between the front and rear standards.
(5) The optimum focus distance is half way between the two distances.
(6) The difference between the two distances is the focus shift. Use this focus shift to calculate the optimum aperture.
Now, that last bit about carrying out a calculation is what OptimumCs-Pro is for. Yes, there is an “image space” option built into OptimumCs-Pro. There is only one input — the focus shift — and one output — the optimum aperture. Optimum focus distance and aperture, when found this way, are independent of focal length.
This astonishingly simple, elegant and uniquely effective method was developed by Paul Hansma (his landmark article, View Camera Focusing in Practice, was published in the Mar/Apr 1996 issue of Photo Technique magazine). Indeed, it serves as the inspiration for the optical science behind OptimumCS-Pro.
Another special case: focus stacking

Shot with a Canon 85 mm f/1.2 lens. For me, there is no need for OptimumCS-Pro here. Nor for TrueDoF-Pro. I almost always use this gorgeous lens at f/1.2. So, why would I need an app for this sort of thing? For landscape photography... well, that's another matter entirely.
Focus stacking is a technique in which you take multiple shots of the same scene—each shot focused at a different distance—and then combine them in focus stacking software to create a sharp image over much greater depth than would be possible with a single shot. [2]
Focus stacking is a lot of fun (everyone should try it), and the results can be stunning. But it has its own limitations. More about that in a minute. First, let’s look at some examples.
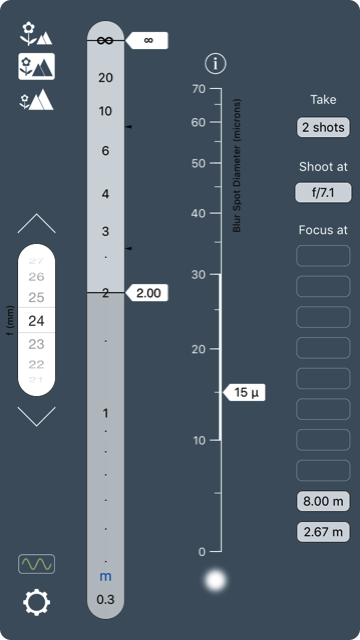
In fact, let’s go back to our very first example. Remember, we were using a 24 mm lens to photograph a scene that extended from 2 m out to infinity. In shooting at the optimum settings, as determined by OptimumCS-Pro, we found that our image would have blur spots no larger than 20 microns. That’s not bad. But let’s say that we’re not happy with 20 microns. We would prefer a sharper image. We want no blur spot larger than 15 microns. Well, we’re simply not going to get that with a single shot (OptimumCS-Pro tells us that 20 microns is the best we can get). If we insist on 15 microns, we’re going to have to take more than one image, and then stack those images in focus stacking software. How many images do we need to take? On what distances should we focus each shot? And what aperture should we use? Shall we turn to standard practice for the answers to these questions? Alas, we cannot, for there is no standard practice. Look for answers, anywhere you like, and you’ll find none save for guesswork.
Well, then, it’s time for another app. This is where FocusStacker comes in.
On the main screen, set 15 microns as your target blur spot diameter. Also, enter the focal length (24 mm) and the distances to the nearest and furthest objects (2 m and infinity), just as you would in OptimumCS-Pro. The outputs are exactly what you need to know: number of shots, focus distances and aperture. Take the specified shots, stack them in focus stacking software and the result will be an image significantly sharper than what you achieved with a single shot.
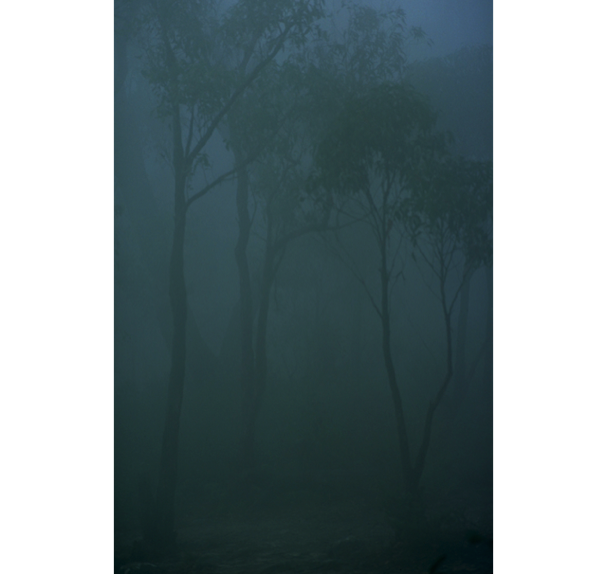
The subject is vertical, so leave your tilt-shift lens untilted. Given the stillness of the air, there is almost zero subject movement, so focus stacking is definitely an option. Whether you bother depends on how much detail you feel you’d like to extract (or can extract through the cloud).
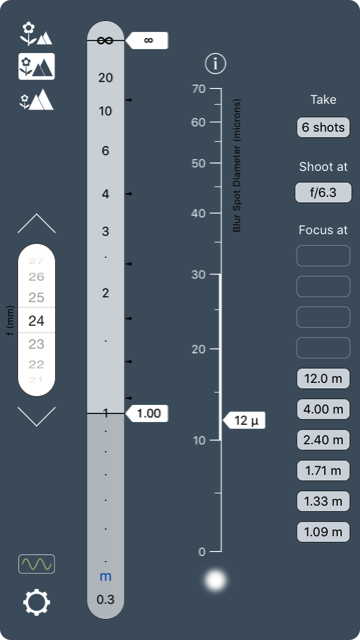
With focus stacking as an option, you can also be more ambitious in your compositions, going after depth of field that you would not normally try to achieve with a single shot. Let us say, for example, that we wish to tighten our sharpness criterion even further, to 12 microns, and also that, this time, we’ll want everything from 1 m to infinity to be sharp. (Try that sort of distance range with a single shot and you’ll end up with blurs close to 30 microns in diameter!) What do we get if we use FocusStacker’s settings? Well, we’ll get our 12 microns (so we’ll have an image dramatically sharper than a single shot could give us, provided our sensor is up to the job), and we’ll get that from 6 shots taken at the indicated focus distances and at the indicated aperture.
You’ll notice that FocusStacker is a bit of a cross between OptimumCS-Pro and TrueDoF-Pro. As in the latter, you specify a desired image sharpness but, as in the former, you input your near and far distance extremes and get aperture and focus distance (or, rather, in this case, distances) as the outputs.
Just how sharp an image can you create with focus stacking? Well, ultimately, you’re limited by what your sensor can resolve. If your sensor cannot resolve detail smaller than, say, 15 microns, then there is no point in setting a value lower than 15 microns on FocusStacker’s settings screen. So, if you want the very sharpest image your equipment can give you, work out what the smallest detail is that your sensor can resolve (a simple method is described in FocusStacker’s user guide), and set that value on the settings screen.
Sounds good, doesn’t it? Well, it is good. But even good things have their limits. Get too ambitious with how much depth of field you want (either by specifying particularly dramatic distance extremes for the focal length you’re using, or by setting a very small blur spot diameter) and you’ll find that the number of required shots becomes ridiculous large. FocusStacker says enough is enough when you get to more than 10 shots. And there are other limitations:
Since focus stacking requires the taking of multiple shots of the same scene, subject motion between shots can be a problem. Some of that motion can be removed in focus stacking software, but that does have its limits too. So it’s best — some would say mandatory — to stick to static subjects when using this technique.
Another, but lesser, issue is that focus stacking is extra work (although, of course, the results may be worth it and, for those who don’t do photography for a living, the extra work may be quite enjoyable).
Focus stacking is not (yet) a widely known or practiced technique. Its use tends to be mainly in macro photography, where it is used without the benefit of a FocusStacker type of app (note that FocusStacker is designed for use in landscape photography and cannot be used for macro work). Focus stacking deserves to be used much more widely, gIven the fact that one can do things with it (quite astounding things, in fact) that simply cannot be done in any other way. And you can get those results without needing any extra equipment at all—such a rare thing in such an expensive pursuit! (Well, OK, you’ll need one app.)
For a detailed but still non-technical discussion of what goes on in focus stacking (at the shooting end rather than the image processing end), check out the article Focus Stacking in Landscape and Architectural Photography.
What technique to use
If you have the necessary equipment, and if you have the time to set everything up, and if the subject matter allows for it, the technique of choice is the taking of a single shot with a tilted lens, using OptimumCS-Pro to determine the optimum focus distance and aperture. Why? Well, because it can give fabulous results with a single shot, never of lower quality than can be achieved with a fixed lens, and often much better.
Pity, though, about all those conditions that need to be satisfied before you can use tilts. If they can’t be satisfied, then you can turn to focus stacking, using FocusStacker to find the shooting info that you need. If focus stacking cannot be used (either because you need to take a shot quickly or, more likely, because the subject matter exhibits significant motion), then you’d take a single shot, with optimum focus distance and aperture determined using OptimumCS-Po.
Summary
How you deal with depth of field will depend on what you’re photographing, on what kind of results you’re after and on what equipment you have available.
If there is a single object of interest, or a tightly clustered group of objects, and if, for technical or artistic reasons, you’ll accept or desire a blurring of the background and foreground, use TrueDoF-Pro to determine the settings that will give you the depth of field that you want, remembering to think carefully about what blur diameter is suitable for your needs. In this type of photography, you’ll use a camera with a fixed (non-tilting) lens. Tilting lenses and techniques such as focus stacking will be of no interest to you (those things were invented for the folks who want huge depth of field).
If, on the other hand, you’re shooting scenes where there is more than one object of interest and these objects are located at different distances from the camera, and you want as much image sharpness as you can possibly get, then you have several options. You can:
• take a single shot with a lens that tilts, having utilised OptimumCS-Pro to determine the optimum focus distance and aperture; or
• take a single shot with a fixed lens, having utilised OptimumCS-Pro to determine the optimum focus distance and aperture; or
• use the focus stacking technique, having utilised FocusStacker to determine how many shots to take, what distances to focus on and what aperture to use.
The first of these is the option of choice where image quality is your priority. The second is the most convenient by far and will often yield excellent results if you’re not too ambitious in how much depth of field you’re after. The third option can yield spectacular results but is severely limited by the nature of the subject matter (which often displays an inconvenient tendency to move). In practice, it is best if you’re familiar with all three methods and can use the one that gives the best results for the situation that you face.
1. If the subject lies predominantly on a horizontal plane, a tilt will give you much greater depth of field. If the subject lies predominantly on a vertical plane (but not one parallel to the film/sensor plane), a swing will achieve similar results. All tilt-shift lenses can tilt or, via a rotation about the optical axis, they can swing. It’s a bit cumbersome to keep referring in this article to “swings and tilts,” so I’ll just restrict the talk to tilts. It’s important to understand, though, that one has the option to swing a lens where the subject geometry calls for it.
2. For ease of use, versatility and, above all else, excellent image quality, the stacking software of choice is Zerene Stacker.
© 2012-16 George Douvos
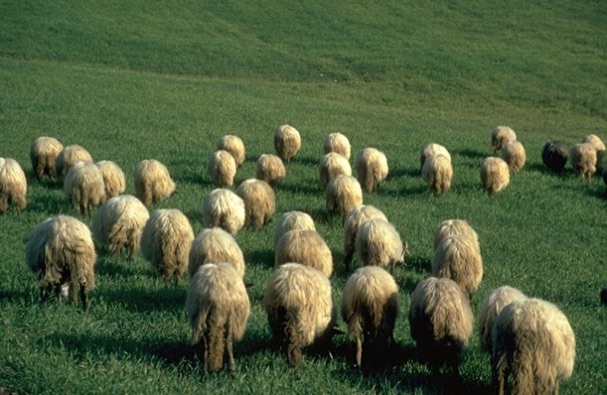
Sheep have a tendency to move. There is no way that focus stacking would be the technique of choice for this photograph. Applying a lens tilt would be ideal, but chances are that you would not have time to set things up. So, a single shot with a fixed lens is probably the best you can do. In situations where you need to move fast, you may not even have time to use OptimumCS-Pro. Never mind—such is life. But if you’ve used the app often enough, you would have a good feel for what settings will give good results.

Shot on film, long ago. It's remarkably similar, I subsequently discovered, to a photo made by none other than Eliot Porter. But, oh dear, check out the ruins of the stone wall to the right in the foreground. Nowhere near sharp enough. This image serves as a useful illustration of the consequences of a cavalier attitude to depth of field — a potentially lovely photo utterly ruined. These days, I use OptimumCS-Pro for shots like this. And I would consider other matters such as, in the above example, perhaps framing the shot a wee bit differently, so as to exclude those stones at the extreme right — there is more to managing depth of field than choosing focus distance and aperture.