Focus Stacker User Guide
George Douvos
1. Quick Start
Start with your camera:
(1) Place the camera on a tripod.
(2) Compose your scene.
(3) Determine the distances to the nearest and furthest objects in your composition.
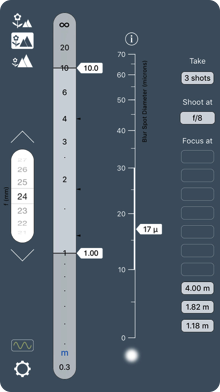
Shift now to the app. All the important action takes place on the main screen:
(4) Use the scroll wheel on the left of the screen to input the focal length of your lens.
(5) Use the sliders on the distance scale to input the distances to the nearest and furthest objects in your scene.
(6) Use the slider on the Blur Spot Diameter scale to set how sharp you want your image to be (specifying a smaller blur diameter results in sharper photographs).
(7) Note the app’s outputs, displayed on the right of the screen.
Now back to your camera:
(8) Set the aperture recommended by FocusStacker, and take a shot of the scene at each of FocusStacker’s recommended focus distances.
And, finally, on to your computer:
(9) Import your shots into focus stacking software to create your final image (try Zerene Stacker, http://zerenesystems.com/stacker/).
2. Instructions
Introduction
Focus stacking is a technique in which you take multiple shots of the same scene—each shot focused at a different distance—and then combine them in focus stacking software to create a sharp image over much greater depth than would be possible with a single shot.
The software for stacking photos is simple and easy to use. But what about the process of taking the shots? How many shots should you take? On what distances should you focus? And what is the best aperture to use? This is where FocusStacker comes in. FocusStacker uses the optimization algorithm developed for the revolutionary OptimumCS-Pro app, but adapted to the taking of multiple shots. For the particular image sharpness standard that you specify, FocusStacker determines the minimum number of shots that you need to take, the distances to focus on, and the aperture to use.
FocusStacker is designed for landscape and architectural photography (it is emphatically not suitable for macro photography).
When to use focus stacking
There is no need to use focus stacking if you can get with a single shot the image sharpness that you’re after. To obtain the sharpest possible single shot, use OptimumCS-Pro to determine the optimum camera settings.
Also, consider using a lens that tilts. With appropriate subject matter, the use of tilts can give you extremely sharp images across a huge distance range. (OptimumCS-Pro can also be used with tilting lenses.)
If a single shot cannot give you sufficient sharpness across the whole distance range, use focus stacking… provided that the subject matter allows for it.
Suitable subject matter
Given that you are taking multiple shots of the same scene, the focus stacking technique works best in situations where there is minimal subject movement between shots. Some subject movement can be removed in focus stacking software, but there are limitations to what can be achieved this way.
Required equipment
You will need:
• a digital camera that allows manual control of focus and aperture;
• a way of measuring distance (e.g. a distance scale on a lens, or a camera that read outs out focus distance, or a laser rangefinder);
• a tripod; and
• focus stacking software (e.g. Zerene Stacker)
Infrared and Ultraviolet Photography
FocusStacker offers the facility to set wavelength. This facility is intended for the benefit of those photographers who shoot in the infrared or ultraviolet parts of the spectrum. For general work, leave the wavelength setting at its default value. If you are shooting in the infrared or ultraviolet, however, you should select a wavelength roughly in the middle of the spectral range in which you are working.
Your spectral range will be governed by two things: The transmission range of the filter you are using and the spectral sensitivity of your film/sensor. Please consult the manufacturers’ literature for this information.
For example, you may be using an infrared filter that transmits radiation only beyond 700 nm, while your sensor (with it’s infrared-rejection filter removed) may be sensitive all the way to 1200 nm. That sensitivity, however, steadily decreases as it approaches that limit. So, peak sensitivity of your filter-sensor combination may be at, say, 900 nm. That, therefore, is the wavelength you would set. Clearly, making changes to the wavelength setting is for advanced users who are happy to do some research.
Limitations
Please be aware that this app is NOT designed for macro or close-up photography (there are sound optical science reasons for this). Its intended use is in landscape and architectural photography, particularly in situations where you want extreme depth, stretching from elements in your photo that are close to the camera, all the way out to infinity. Indeed the distance scale is designed with this use in mind, not for close-up work.
Using FocusStacker, step by step
1) Choosing how sharp you want your image to be
You need to specify how sharp you want your final image to be. You do this on the main screen by setting the diameter for the largest blur you are willing to tolerate in the image. This is akin to setting a “circle of confusion” on a depth of field calculator. [1]
Say you set a blur diameter of 15 microns. In FocusStacker, this means that you want a final, stacked image that, if it had been on your sensor, would have had no blur spots larger than 15 microns.
If you choose a small blur spot diameter, you will end up with a sharper final image. But you’ll have to take more photos to achieve that final image sharpness.
There are, of course, limits to how large or small a blur diameter setting you would choose.
Maximum blur diameter setting:
Traditionally, a circle of confusion of 30 microns was recommended for 35 mm film, and this has carried over into the digital age for sensors of the same size, and depth of field scales on lenses are still calculated by lens manufacturers using this value. That 30 micron value was always too large for quality work. If you’re using the focus stacking technique with a 35 mm sensor, you’ll certainly choose a blur diameter smaller than 30 microns. Similar reasoning applies for other sensor formats. The maximum settings for blur diameter that you would consider for various formats is indicated adjacent to the blur diameter scale.
Minimum blur diameter setting:
There is no point in specifying a blur spot diameter that is smaller than what your sensor can resolve. There’s a quick and easy way to work out how small you can go. Assume that your sensor can resolve detail no smaller than 2 pixel widths. You’ll thus need to work out how wide 2 pixels are:
(1) Look up the specifications of your sensor.
(2) Divide the sensor width (in mm) by the number of pixels across the width. That gives you the width of one pixel.
(3) Multiply by 2. That gives you the minimum blur diameter, measured in mm.
(4) To convert to microns, multiply by 1000.
If, for example, your sensor is 36 mm wide and has 7360 pixels across that side, then each pixel is 36/7360 = 0.005 mm wide. Two pixel widths is therefore 0.010 mm, or 10 microns.
2) Inputting data
On the main screen, there are only 3 further inputs to make: the focal length of your lens and the distances to the nearest and furthest objects in the scene you’re photographing.
Note: Set the actual focal length, as printed on the lens. Do not carry out any “35mm / full-frame equivalent” conversions.
The UP and DOWN buttons, located above and below the focal length scroll wheel, are intended for very rapid setting of commonly used focal lengths. Use the focal length presets feature, accessed via the “f Presets” button on the Settings screen, to select the focal lengths that you would like these buttons to jump to.
3) Taking the specified shots
FocusStacker’s recommended aperture setting should be used where possible. Shooting at +/-1/3 or +/-1/2 f-stops from the recommendation aperture will result in negligible reduction in image quality. Shooting at +/-1 f-stop from the recommended aperture will result in about a 10% drop in image sharpness.
Note that, with most lenses, even high quality ones, you should avoid shooting wide open or at apertures close to wide open. So if you find that the recommended aperture is close to the widest aperture of your lens, it would be a good idea to stop down a little.
Use your lens’ distance scale, if it has one (or your camera’s focus distance readout, if it has one), to set focus distances. You may find that distance scales can be difficult to use at the far end on the scale. In such cases, it may be better to estimate distances and focus on points at the appropriate distances. For better results in such circumstances, consider using a laser rangefinder (a cheap one will do).
Use a tripod so that your shots are taken from a fixed position and so that framing is consistent between shots.
Keep exposure consistent between shots. Thankfully, this is easy to do, since the ideal aperture is the same for every shot.
Use a low ISO. By “low,” I mean no more than 100. Image stacking software tries to preserve detail in individual shots, while discarding blurry portions of images. To avoid having the software interpret sensor noise as detail, keep noise to a minimum by sticking to a low ISO.
4) Creating the final image
You will need to import your photos into focus stacking software in order to create the final image. For ease of use, versatility and excellent results, I recommend Zerene Stacker: http://zerenesystems.com/stacker/
3. Acknowledgement
I would like to thank Bud Perrott for the excellent discussion we had on focus stacking (and for his sample images) that inspired the creation of this app.
_________________________
[1] There is one important difference between a blur spot diameter and a circle of confusion value: The blur spot diameter is the diameter of a real-world blur, caused by a combination of defocus and diffraction. It is therefore more accurate than a circle of confusion value, which ignores diffraction.
© 2013-2016 George Douvos

1
Use the scroll wheel to set the focal length of your lens.
2
Slide these pointers to set the distances to the nearest and furthest objects in the scene you are photographing.
3
Slide this pointer to set how sharp you want your image to be.
4
Shoot as indicated.
Quick Start
User Guide in Full