TrueDoF-Pro User Guide
George Douvos
1. Quick Start
Depth of field depends on:
• Focal length
• Focus distance
• Aperture
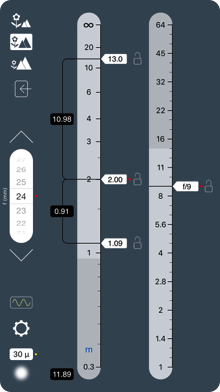
Set these on the main screen, where they are indicated with red markers (use the scroll wheel to set focal length, and slide the pointers to set focus distance and aperture). The region of acceptable sharpness is between the upper and lower markers on the distance scale.
Of course, the depth of this region also depends on what you define as “acceptable” sharpness. You define this by setting a suitable blur spot diameter (circle of confusion). On the main screen, tap the Blur Spot Diameter Button (it’s the one at bottom left) and then slide the pointer to set your chosen value (the standard values for various film/sensor sizes are shown as a guide).
There is much more to TrueDoF-Pro. For example:
• You can directly set the near and far limits of depth of field — simply slide the relevant pointer.
• If you wish, you can lock any pointer in place (one pointer can be locked at any given time). You can freely move any other pointer. You’ll notice that one or other or both of aperture and focus distance need not be inputs — they can instead be outputs. Depth of field need not be an output — it can be an input. You can even use this depth of field calculator “backwards,” i.e. you can set the depth of field you want, and have TrueDoF-Pro tell you what focus distance and aperture you need to set.
And here’s one thing to keep in mind:
• By default, calculations of image sharpness in TrueDoF-Pro take diffraction into account. This results in much more realistic outputs. Of course, if you’re not comfortable with this diffraction business, you can go to the settings screen and disable the diffraction option.
That covers the most basic functionality. You can be confident that you’ll discover much by experimenting with the app — TrueDoF-Pro really is quite intuitive and, besides, there are “info” buttons scattered liberally around the app for context-specific help. There is much to be gained, however, by reading this User Guide. Always remember, “When in doubt, read the instructions.”
2. Instructions
Overview of the Interface
The most prominent items on the main screen are a scroll wheel for selecting lens focal length and two scales, one showing distance, the other aperture. Anything that you can interact with (scroll wheel, buttons, sliders) is shown in white. The items marked with a red dot (lens focal length, focus distance and aperture) correspond to settings on your camera. The other critical item is the blur spot diameter (circle of confusion) setting. This is highlighted with a yellow dot.
The interface is as interactive as can be: your inputs result in real-time updating of all relevant quantities and, because information is presented both graphically and numerically, things move and numbers change as you make input changes.
Particularly useful are the locks for the sliders. See below for a discussion on what they can do for you.
Set Blur Spot Diameter
Setting blur spot size is the very first thing you do in any depth of field calculator. It is an absolutely critical setting!
Tap the “Blur” button at bottom left of the main screen. Then, on the screen that presents itself, use the slider to select a blur size that you deem acceptably small. Use this setting as you would use a “circle of confusion” setting on any other depth of field calculator. The idea is to choose a blur size, as it would appear on your film/sensor, that is small enough not to be noticeable as a blur when your image is displayed on screen or is printed. Standard settings for various film/sensor formats, both for still photography and motion picture work, are listed alongside the blur spot diameter scale.
The “standard” settings should be considered merely as starting points in determining an appropriate blur diameter.
In still photography, the suggested settings may prove adequate for work destined for electronic display but certainly not for fine art prints. For critical work, you will need to set a smaller diameter. But, of course, there is a limit to how small you can go—there is no point in specifying a blur spot diameter that is smaller than what your sensor can resolve. There’s a quick and easy way to work that out. Assume, as is sufficiently accurate for our purposes, that your sensor can resolve detail no smaller than 2 pixel widths. You’ll thus need to work out how wide 2 pixels are:
• Look up the specifications of your sensor.
• Divide the sensor width (in mm) by the number of pixels across the width. That gives you the width of one pixel.
• Multiply by 2. That gives you the minimum blur diameter, measured in mm.
• To convert to microns, multiply by 1000.
If, for example, your sensor is 36 mm wide and has 7360 pixels across that side, then each pixel is 36/7360 = 0.005 mm wide. Two pixel widths is therefore 0.010 mm, or 10 microns.
Bottom line: Choose a blur size that is somewhere between the standard setting and the resolving power of your sensor. Experiment and see what meets your needs.
This topic is covered in detail in the article, Depth of Field, Diffraction and High Resolution Sensors at www.georgedouvos.com (available via TrueDoF-Pro’s Links page).
The Role of Diffraction
Diffraction is the blurring caused when light passes through small apertures. You have the option to treat image blur realistically by including the effects of diffraction in TrueDoF-Pro’s calculations.
In the real world, image blur is caused both by defocus (objects not being at the focus distance) and diffraction. Defocus blur decreases with f-number, while blur due to diffraction increases. There is thus a limit to how large an f-number you can use before the effects of diffraction become dominant and further increases in f-number result in less sharp images (in effect, less depth of field).
If you have enabled the diffraction option, TrueDoF-Pro does not permit aperture settings that exceed the above-mentioned limit.
TrueDoF-Pro can display the limits imposed by diffraction by subtly greying out the appropriate sections of the aperture and distance scales. To choose between showing or hiding these limit indicators, go to the Settings screen and, for the Limits option, select Show or Hide. Irrespective of whether you choose to show or hide the limits, you are not permitted to exceed them. Note that the Limits feature, and restrictions on your inputs, are disabled if, on the Settings screen, you choose the option to ignore diffraction.
For more info on image sharpness, with easy to understand graphics, see the article Image Sharpness vs Aperture at www.georgedouvos.com (available via TrueDoF-Pro’s Links page).
Not comfortable with this diffraction business? No problem—simply deselect that option. To choose between including or excluding the effects of diffraction, go to the Settings screen and choose YES or NO on the Diffraction option.
Setting Focal Length
Set the actual focal length, as printed on the lens. Do NOT carry out any “35mm / full-frame equivalent” conversions.
The UP and DOWN buttons, located above and below the focal length scroll wheel, are intended for very rapid setting of particular focal lengths (presumably the focal lengths that you use often). Choose what you want these particular focal lengths to be by tapping the “f Presets” button on the Settings screen.
Setting Focus Distance
The easiest way to set focus distance is simply to slide the focus distance pointer. The pointer can be set, via the Distance Snap option on the Settings screen, to slide freely or to snap to distance increments. Chances are you’ll love the snap function!
Should you wish, you may enter the desired focus distance via keypad. To bring up the keypad, tap the “Enter” button, located on the left side of the main screen. Note that:
• The “Enter” button is not shown if the focus distance pointer is locked (see below for a discussion on the use of locks).
• If you have locked the near or the far limit pointer, the range of focus distances that you may select is restricted (it is restricted by the fact that aperture now becomes an output, and aperture cannot take on an infinite range of values). If the focus distance you enter on the keypad exceeds the maximum possible value, the focus distance will be set to the maximum possible value. If the focus distance you enter on the keypad is less than the minimum possible value, the focus distance will be set to the minimum possible value. You will be alerted to instances in which this sort of thing occurs by the focus distance and aperture readouts appearing in red.
Setting the Near or Far Limit of Depth of Field
Simply slide the pointers to set these.
Like the focus distance pointer, these pointers respond to your chosen “snap” option. Note, however, that distance snap is not carried out if a pointer has reached the limit of its permissible travel.
You will notice that, if the near and far limit pointers come too close to the focus distance pointer, they disappear and are replaced by simple labels for display of distance. The app continues to function, of course, just like any depth of field calculator with the usual inputs (focus distance, aperture and focal length). You’ll get your near and far limit pointers back when you make a change via the other available inputs (focus distance, aperture and focal length) that results in more depth of field.
Using the Locks
The various distance pointers and the aperture pointer can be locked in place. There is a Lock button associated with each pointer. That button can display a “locked” symbol or an “unlocked” symbol.
So, simply tap an unlocked button to lock its associated pointer. Unlock a pointer by tapping its locked button, or tap the unlocked button of another pointer.
Be aware that only one pointer may be locked at any given time.
Any other pointer can be moved while any given pointer is locked.
This opens up all manner of ways of working with depth of field. For example:
• A cinematographer can set the far limit of DoF to the far end of the set, lock it in place, and then vary any other input (focus distance, near limit of DoF, aperture, or focal length), knowing the background will always be sharp.
• A landscape or architectural photographer can specify the DoF he wants simply by setting the near limit of depth of field, locking it in place, then setting the far limit (or vice-versa). TrueDoF-Pro will instantly display the focus distance and aperture that will give the required depth of field. Yes, at last, a DoF calculator that can work “backwards!”
All manner of other examples are possible (see below, for example, on how to use the lock feature to work in Hyperfocal Mode). You’ll notice that one or other or both of aperture and focus distance need not be inputs — they can instead be outputs. Depth of field need not be an output — it can be an input. It all depending on what you want the app to do for you.
A few lock-related matters:
• If you leave all pointers unlocked, and you slide any pointer, one other pointer will automatically be the designated “locked” pointer, albeit temporarily (only while you’re sliding). For example, if you slide a distance pointer, the aperture pointer does not move (and it is temporarily shown as locked). If you slide the aperture pointer, the focus distance pointer stays in place (and it is temporarily shown as locked). So TrueDoF-Pro, in this case, behaves in the traditional way. It all changes, of course, if you lock a slider.
• The lock button on the aperture slider is, strictly speaking, not really necessary (you’ll see why as you become familiar with the app). It may be helpful, however, to apply the lock in situations where you absolutely do not wish that aperture setting to be changed accidentally.
• When distance sliders come too close together, clutter is avoided by having the locks disappear, save for one of them. If a slider has been locked, its lock remains visible while the other two disappear. If no slider has been locked, it is the focus distance lock that remains visible. Don’t worry, you get all your locks back when you increase the distance between the sliders a wee bit.
• If you lock one of the distance pointers, and then slide one of the other distance pointers, aperture becomes an output. And aperture can only take on a particular range of values, with f/1 being the minimum and the maximum being determined by your chosen maximum on the scale (f/22 or f/64) or by the effects of diffraction (you are not permitted to select aperture values that result in overwhelming diffraction, i.e. where further increases in f-number result in the increase in diffraction blur being greater than the decrease in defocus blur). Now, having said all this, it should follow that the distance pointers will be constrained in terms of the range over which they can be set. If you find you cannot slide a distance pointer beyond a certain point, take a look at the aperture readout: You all find that you have reached the end of the scale.
• A word about accuracy: If you have locked one of the distance pointers, and are sliding one of the other distance pointers, all of the numerical displays of distance and aperture update instantly and accurately (yes, aperture is an output in this case). When you release the pointer that you have been sliding, the aperture pointer will snap to the nearest increment. No distance readouts are changed when the snap occurs, simply because you would not want your input changed. There is no inaccuracy in the app — just a snap to nearest aperture increment.
Hyperlocal Mode
To enter Hyperfocal Mode, simply slide the far limit pointer to infinity and lock it in place. You can now change any input you want, knowing that the far limit of depth of field will aways be at infinity.
Distance Scales
You may choose between 3 different distance scales via the buttons at the top left of the main screen. Each scale is available in units of meters or feet (you may toggle between units by tapping the “m” or “ft” button on the distance scale) . All scales read from 0.3 m (1 ft) to infinity. The first scale emphasises the near distances and is more useful for work with very wide angle lenses. The second scale is a general purpose scale. The third scale emphasises the far distances and is therefore more useful for work with long lenses.
Changing scales has absolutely no effect on outputs.
Note that the first scale is not intended for precise macro work (well, nor is any other scale, for that matter). Depth of field in macro photography is hideously complex and cannot be calculated accurately for today’s asymmetrical, floating element (internal focusing) macro lenses, unless one is a lens manufacturer and thus privy to the details of the particular lens design. Do not try to use this app for macro work.
Numerical Readouts of Depth of Field Values
Numerical distance readouts are accurately calculated by the device’s processor and then rounded off for display. Should the displayed values not seem quite right, this may be put down, not to inaccuracy, but to the effects of final rounding. It’s quite harmless.
For general photography, the numerical readouts are best ignored—they show nothing that cannot be seen, via a quick glance, at the analog distance scale. If you find them distracting, the readouts of focus distance and near and far limits of depth of field can be disabled via the Settings screen. The readouts can be useful, however, in some circumstances, which is why they are available if required.
Numerical Readouts of Image Blur
Instead of displaying numerical readouts of distances, you can opt to display readouts of image blur for objects at the extremes of depth of field and at focus (where image blur will be non-zero if you opt to include the effects of diffraction). That option is selected on the Settings screen.
Why would this be useful? After all, image blur at the extremes of depth of field should simply be your specified circle of confusion. Yes, but not if you focus beyond the hyperlocal distance.
Some landscape photographers place greater emphasis on image sharpness for far objects (the horizon or, say, a line of trees on a ridge) than for near objects. They reason that the eye/brain expects distant objects to be sharp but can tolerate a wee bit of image blur up close. So they focus a little beyond the hyperlocal distance. If you like to follow this approach, you can make use of the readouts of image blur to better judge where you would like to place focus.
Image blur is shown in micron (1μ = 0.001mm)
By the way: You'll have the far limit pointer at infinity, but don't lock it in place. Locking it engages Hyperfocal Mode, which you don't want in this case.
Setting Wavelength
If we take diffraction into account, it follows that wavelength plays a role in our calculations (diffraction effects are greater at longer wavelengths).
The facility to set the wavelength is intended for photographers who shoot in the infrared or ultraviolet. For general photography, leave the wavelength at the default value. If you are shooting in the infrared or ultraviolet, select a wavelength roughly in the middle of the spectral range in which you are working.
Your spectral range will be governed by two things: The transmission range of the filter you are using and the spectral sensitivity of your film/sensor. Please consult the manufacturers’ literature for this information.
For example, you may be using an infrared filter that transmits radiation only beyond 700 nm, while your sensor (with it’s infrared-rejection filter removed) may be sensitive all the way to 1200 nm. The sensor’s sensitivity, however, steadily decreases as it approaches that limit. So, the peak sensitivity of your filter-sensor combination may be at, say, 900 nm. That, therefore, is the wavelength you would set.
Clearly, making changes to the wavelength setting is for advanced users—those who are happy to do some research to determine the appropriate setting.
Please be aware, though, that the effects of changing wavelength are very small at wide apertures, where there is little diffraction. At large f-numbers, the effects of changing wavelength are noticeable and affect, in particular, the maximum aperture that may be used before diffraction makes it impossible for you to achieve your desired image sharpness standard. The wavelength setting may therefore be significant to those who are fastidious in the pursuit of ultimate quality in infrared photography.
One more thing: You know that infrared focusing mark on your lens? Yes, you need to use it to focus, but does this affect depth of field calculations? Well, shooting in the infrared is equivalent to shorting with a lens of slightly longer focal length. So the appropriate change to make in a depth of field calculator is in the chosen focal length. The thing is that the change works out to an inconsequential amount — less than 1mm in practical cases. So, just ignore this — it’s one less thing to worry about in the complex world of infrared photography.
Other Settings
The app provides numerous settings that, in their various combinations and permutations, allow for significant customisation. These settings are either self-explanatory or are accompanied with their own help screens. Explore and enjoy!
3. Other Options
If you shoot landscapes and architecture, in which you usually want maximum sharpness (not just “acceptable” sharpness) over a large depth of field, or if you’re a cinematographer seeking to keep people and objects at different distances in your shot sharp, there is only one tool for your purpose: OptimumCS-Pro. Set the distances to the nearest and furthest objects that you wish to appear sharp and simply let OptimumCS-Pro determine the camera settings (focus distance and aperture) that will give you the sharpest possible image. This is functionality no camera offers, and certainly nothing that any depth of field calculator offers. OptimumCS-Pro is not a depth of field calculator that “works backwards.” It is a fundamentally different and unique tool, and a joy to use.
And if you need extreme (or even insane) depth of field in landscape or architectural photography, consider FocusStacker, the unique app that takes the guesswork out of focus stacking. Use its suggested settings to produce astonishing sharp images, down to the very limits of what your sensor can achieve.
4. Contact
I always appreciate feedback and work hard to meet customer needs through frequent updates. Please feel free to contact me at george@georgedouvos.com.
© 2012-2018 George Douvos
Quick Start
1
Tap this buton to set your target blur spot diameter. Your choice will mostly depend on the size of your sensor. Guidance is provided.
2
Use the scroll wheel to set the focal length of your lens. Use the sliders to set focus distance and aperture.
3
These pointers indicate the near and far limits of depth of field. You can slide these pointers if you wish to set your distance extremes directly.
4
You may lock any pointer in place, and freely slide any other pointer — work any way you like.
User Guide in Full